
Sept. 25th, 2017: Vittoria Terreno Dry review ...
Blog update ... it has been a while ...
It has been a while. But in that time we have been testing new products and seeing if they meet our discerning tastes. First up, fresh off of 1000km of mixed surface riding is the new Vittoria Terreno Dry 33c TnT tire.
This tire is perfect for mixed surface (or GROAD) riding as it features a smooth rolling file tread middle line and a modest side knob intended to let you hook up when things get a little bit rougher. It comes in 31, 33 & 40c sizes with the 33c being the tire we tested. The Terreno dry is a TnT tire (tubeless) and features Graphene which is intended to reduce wear and decrease rolling resistance.
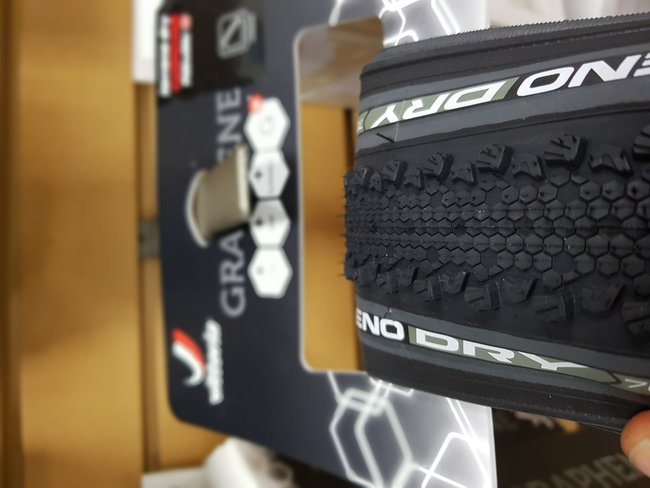
It is a tire that suits Taylor & Tims favourite style of riding and is very similar in appearance to the Bontrager CXO, a favourite for grinding the gravel.
So, how did it fare?
Setup: They were setup on a pair of Bontrager Paradigm Elite TLR wheels w/ Bontrager strips & valves + 2oz of Stans sealant. I was doing my 'new bike build' at home so I was without a compressor and was relying on the handy Bontrager Flash Charger to seat the bead.
I was able to snap the tires on, by hand, and with a single discharge from the pump I was able to seat the tires. When I deflated them to put in the sealant the bead stayed locked to the rim ... a great sign. So, overall, one of the easiest setups I have experienced.
They mounted to the 19.5mm inner diameter rim as a 35mm tire, only a problem if you are a professional cross racer.
Performance: I put approximately 1000km of VERY mixed terrain, running anywhere from 25psi (too low) to 50psi (too high) through gravel, pavement, single track ... you name it.
Running 30-35 psi seemed to be the sweet spot for rough terrain comfort/hookup and pavement speed. They rolled faster on smooth surfaces than any file tread I have used and they worked VERY well (for a file tread) on single track. I was able to survive the Arkel trails, Twin ponds and Guelph Lake very regularly. I spent a good amount of time on rail trail (including a 160km ride to Belfountain w/ James) and they rolled very nicely. Gravel roads ... no problem as we have some pretty smooth roads around here.
While I enjoyed the 33c tires I think, if you had rougher terrain (our gravel roads are pretty close to paved...) the 40c would be an excellent choice to take more of the edge off.
Wear: I didn't experience any burps and the tires wore very well. At around 900km the very center line of the tire started to wear smooth which, given the amount of pavement they experienced, I was very pleased. The running surface of the tire resisted wear considerably better than previous file treads. I'm not sure if it was the graphene but, I'm not going to argue the point.
Even though the center line on the rear tire has worn, the performance has not changed. I expect another couple 100km of riding before I change out the rear tire. The front tire looks as new as the day I installed it.
While we don't have alot of sharp rock around, the tires did survive some treacherous descents and rougher than usual terrain and I experience zero flats. When I took them off to check sealant levels I didn't find a single latex ball in the tire, meaning, not many punctures.
Conclusion: If multi surface is your thing and you are looking for a durable, moderate weight (410g) tubeless tire I would highly recommend the Vittoria Terreno Dry. I intend to put on a lot more km so stay tuned for another update come Spring.
Jan 16th, 2017: Layering for the big outdoor rides
Nov 25th, 2016: New bike? #fitfirst ... Cosmos case study part #1
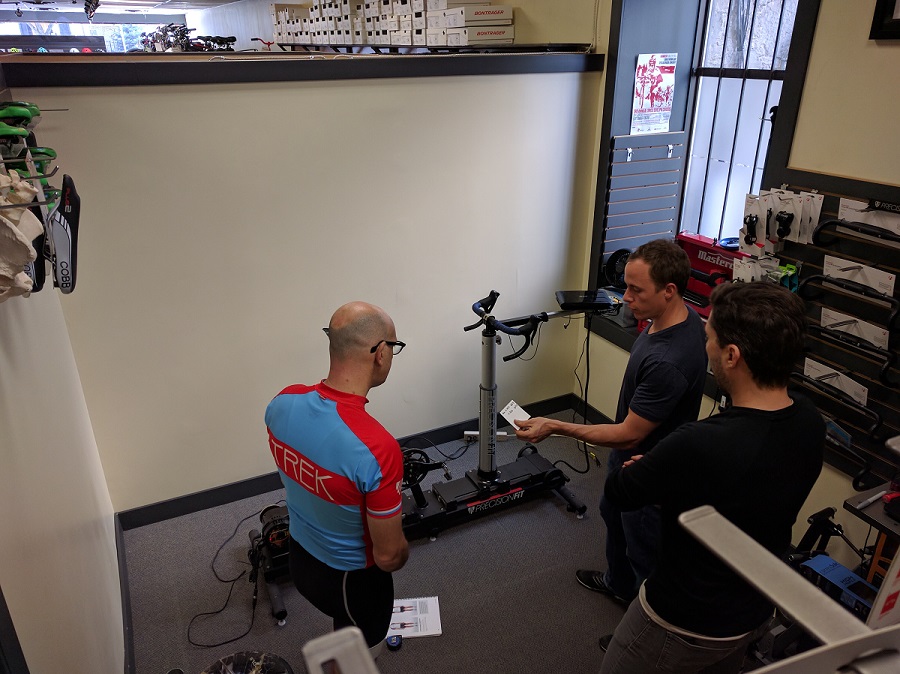
We are constantly training. In house or out of store we take the off season seriously and when time allows we get down to ... getting better!
This past Monday we were putting Taylor and Cosmo through some fit training. Cos was down to his commuter and mtb so we were going to be combining the fit training with the proper first step in any bike acquisition ... getting fit, first.
Like all good bikefits we started with a detailed interview followed by a physical assessment. Without divulging Cosmos secrets we can say that he was impressively mobile, and flexible, with no glaring issues aside from his reported hand and neck discomfort on long rides. We know he had been struggling with comfort this past season on his cyclocross bike (which featured an aggressive race geometry) and we learned that gravel and road were high on his list of priorities for this bike. Rides would be largely solo and needed to provide comfort for rougher terrain and longer miles.
As Cosmo didn't have a bike at this time we used our precision fit size cycle and purely custom software to dial up a bike ...
We set the bike up for a standard 54cm Domane SLR and went to work. To keep things from dragging too long we made a few initial changes such as:
- Cleats were adjusted rearward and positioned, rotationally, to allow more free float and create less strain on the knee
- A proper footbed was put in the shoe to increase the foot contact between the foot and the shoe ... increase his surface area contact. Why? Pressure = force/area so ... SCIENCE!
- Narrower bars were chosen. We had measured Cosmo with a 40cm shoulder width and typically he had ridden 42cm bars. As he reported hand and neck discomfort we saw this as a way to improve things.
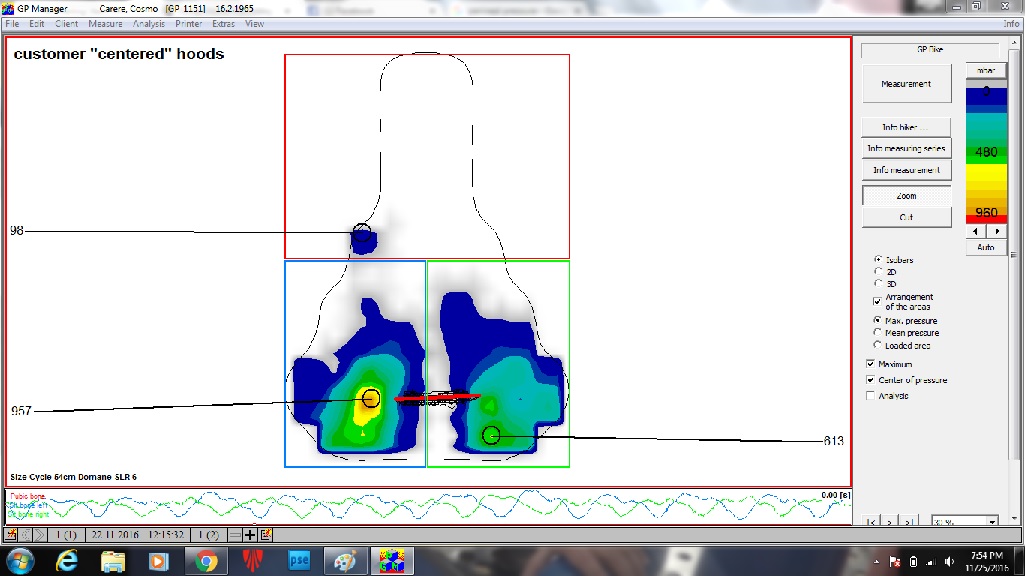
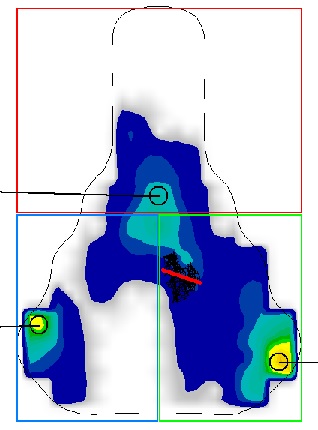
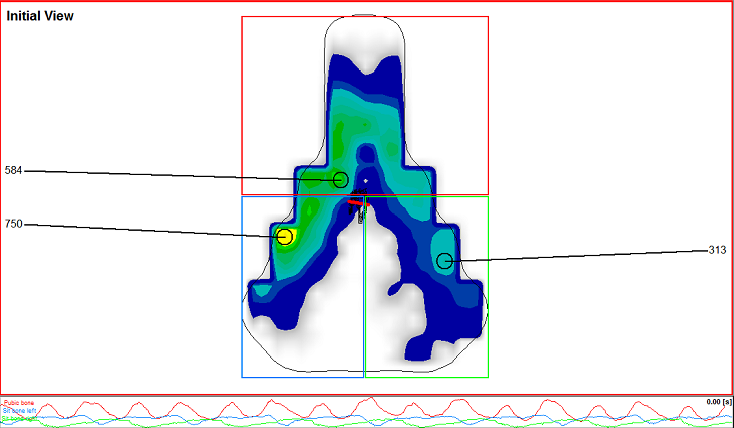
We ran an initial pressure analysis and this is what we saw ...
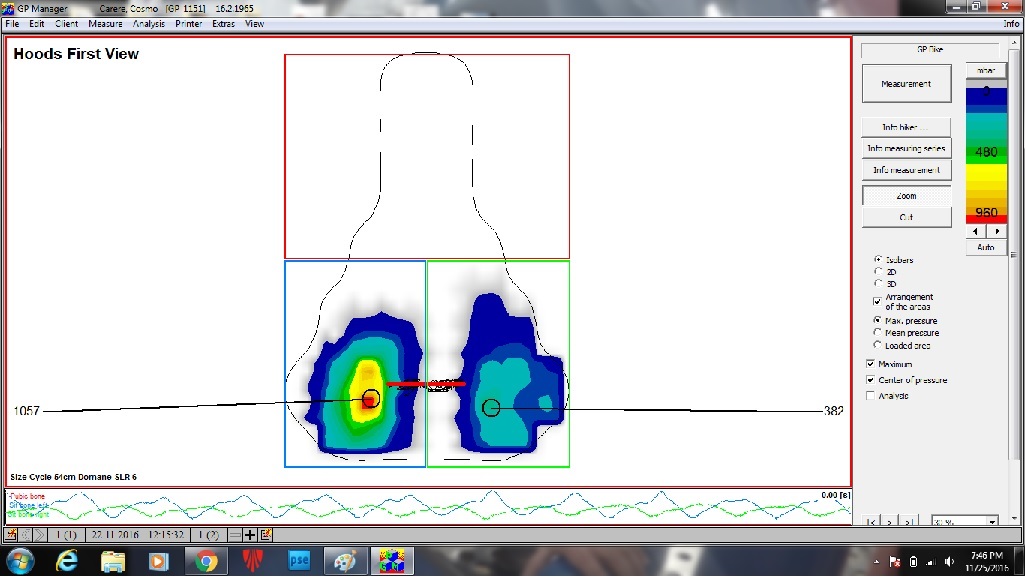
So, no perineal pressure but excessive pressure on the left side with the numbers showing that Cosmo bore 66% of his weight on the left. This means that he constantly had his right side shifted off the saddle. Interesting.
At this point Cosmo developed an introspective look and said "oh yeah, I tend to get irritated on my inner left thigh ...". Yep. He would. So while things were looking better than terrible we knew we still needed to work on this saddle. After some brainstorming we made the following changes...
- Shorter stem. This reduced the high point and brought Cos to a 58/42 position on the saddle.
- Lower front end. We saw that Cosmo had less pressure in the drops so we thought that a lower handlebar position would help. This brought a reported increase in comfort but numerically, no change occured.
- Cosmo reported that he felt the saddle was low so we raised it a cm. This was abandoned after pedalling mechanics got 'worse' and saddle pressure increased as well.
- We worked to get Cosmo 'feeling' centered on the saddle and practicing centering himself.
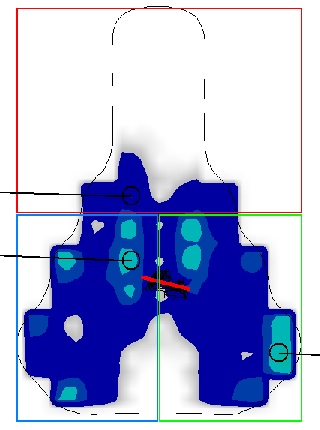
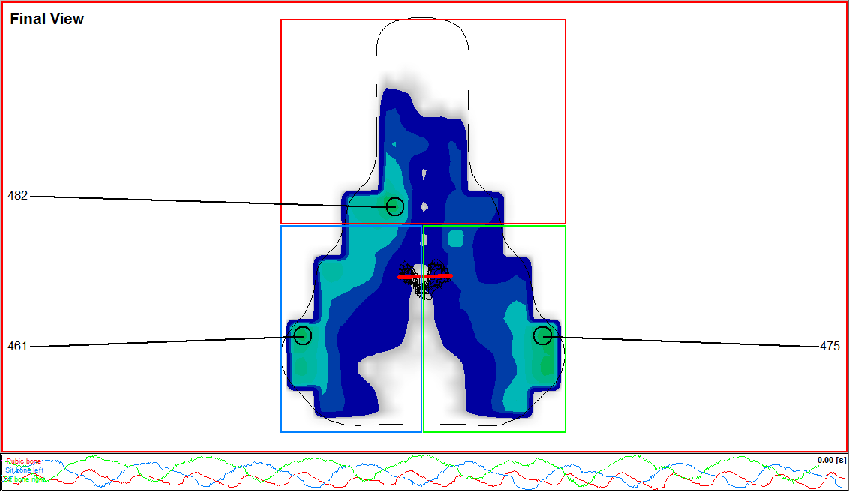
The end result of this work was we reduced peak pressure by over 100mbar, from the initial impression, and got to a 55/45 position on the saddle. So, a vast improvement as seen below...
This was better. Much better. And if we didn't have the size cycle this might have been where we had to stop BUT we have a size cycle. And I know the power of short cranks. Shorter cranks? Yep. Shorter cranks.
Cosmo typically rides 172.5mm cranks on his road and cross bikes so, with a few spins of the allen key we dropped the length to 165mm. The saddle was raised 7.25 mm as were the bars to compensate. Cos hopped on and started spinning and, lo and behold, with no coaching and no verbal cues ...
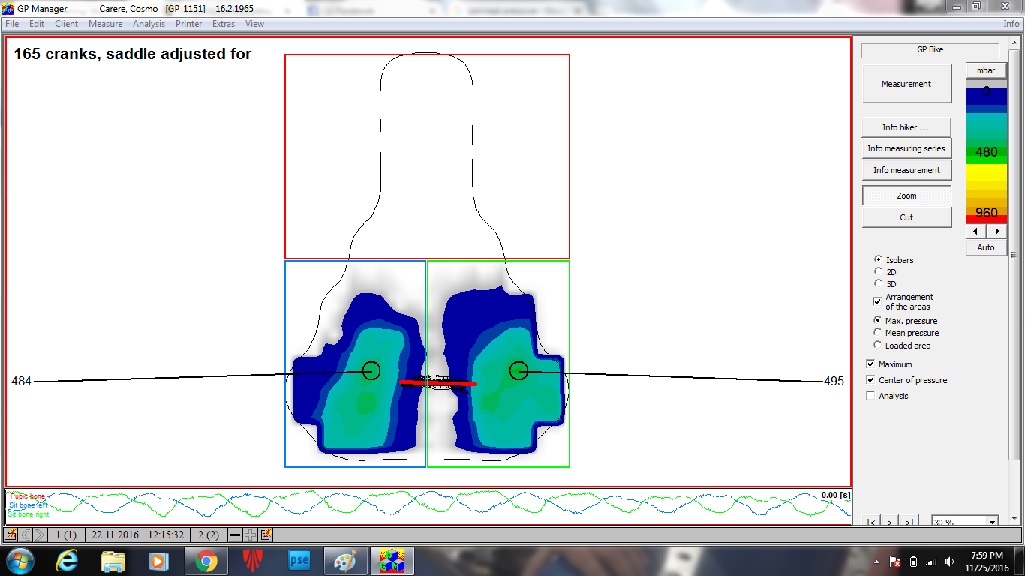
Cosmo was now 51/49 on the saddle. We had ...
- Reduced his peak pressure from 1057mb to 484mb
- His pelvis now moved evenly side to side (see the perfect sinusoidal waves at the bottom of the image)
- He reported vastly greater comfort and he looked smooth and supple like a youthful Eddy Merckx
- Cadence crept up 8 rpm (or so)
- As the fit progressed Cosmo remarked that his feet were feeling much better. While he didn't know they weren't optimal they were so much better he was feeling happy about it.
So we found a saddle, a bar and a set of X/Y co-ordinates for a bike. Next blog post we go over how we take the size cycle measurements and apply them to a stock bike ...
Nov 6th, 2016: Why start your fitting process in the winter ...
We like to recommend that fit clients start their fit journey in the winter ... heck, in the fall even if possible. Why would you want to do that?There are numerous reasons but let us go for the simplest and most logical reason, giving your body time to adapt. Let's run through two potential scenarios as an example:
Imagine you have just finished your season. Your left knee gets a bit tender after long rides, you experience some tingling in the hands on longer rides and you are pretty non-commital about your saddle (it 'works'). Everything feels ... fine, you guess ... and you chalk the discomfort up to a host of things like ... you've been working more, you've been training less, you just bought a house, you just had a child etc. etc. It is just part of being a cyclist, right?
Scenario #1: Nothing screams "WRONG WRONG WRONG" so you don't bother getting your fit checked. You log your winter miles on the trainer and your fitness is coming along swimmingly. Your first goal event of the season is on the horizon and although your knee is a bit twingy, that's just part of cycling. Early season road miles start to accumulate, group rides are commenced, event is a week out and BAM. Knee pain. Not just a bit twingy but debilitating enough that you pass up on the event, can't ride as much and the hard work you put in over the winter starts to fade away. After a few PT sessions you decide maybe it is time to go get a bike fit ...
Scenario #2: It can't hurt to have a professional check things out. You head in for a bike fit and a few things crop up in the assessment. Lacking internal hip rotation on the left side, arch collapses more on the left side and a few more 'interesting' points.
Anyways, assessment done you get on the bike and the bike portion begins. The feet are given greater surface contact and support (insoles), the saddle is found to be a good saddle but you need coaching to sit on it square etc. etc. By the end of the fit you feel better (your contact points) but you can't help but comment that it feels like you are working harder ... which worries you. Your bike fitter gives you this analogy ...
Imagine a tall field of grass in which a path is knocked down and easy to follow ... that is your current 'path of least resistance' way of cycling. You have some habits and some products that are slowly leading you towards injury or at bare minimum costing you comfort and performance. But it is easy.

Through some product adjustments, position adjustments and coaching we are asking you to leave that path and push your way through the long grass to create a newer, better path. It is harder, it requires more work and it will seem like you are taking a step back. But, before long, the path gets beaten in and becomes the new norm ... a new normal that will not cause injury and will allow you to be as comfortable and powerful as possible. Eventually this path will feel as 'easy' as they other path.
Analogy finished the bike fitter lets you know adaptation can take 2+ weeks and it is a good thing you came in at the beginning of the winter season. Lots of time to put in the work, fix up the body and lay a foundation for the next season.
So, you take the time to adapt, you come back for a follow up to ensure everything is ticking along nicely and you begin to build your fitness for next year. Spring comes, miles are laid, events are conquered and you feel fantastic and powerful.
And that is why we recommend getting a fit through the winter. If things need to change, the best time to change them is when you can easily control the variables, not when you want to go out and log huge miles, compete with your friends or just ride as much as possible. Get the fit done, work on adapting and then enjoy a fantastic season.
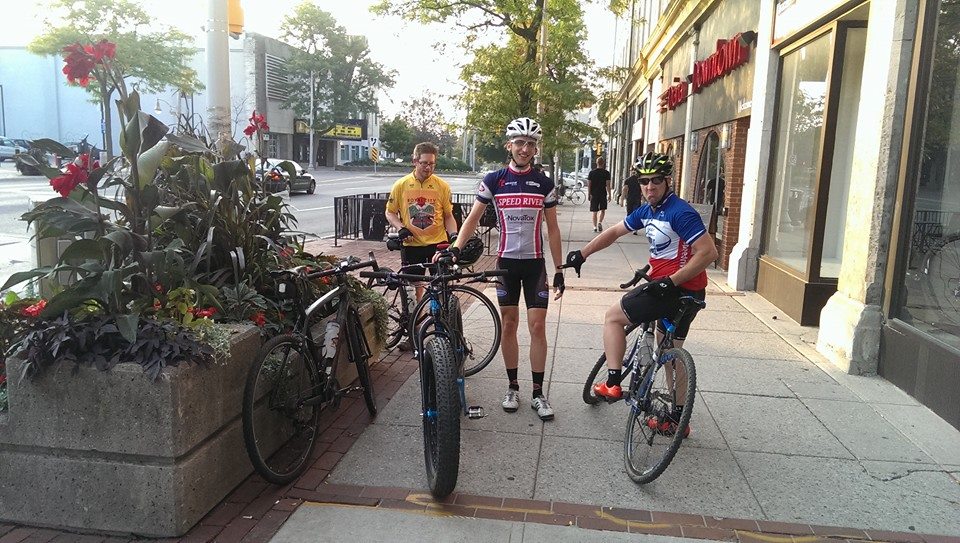
July 19th, 2016: Taylors Gravel Adventures ...
Perhaps by now you’ve heard talk of adventure road, multi-surface rides, or even gravel grinding. We have been pushing and pursuing the trend at SRB, first by running different cross bikes w/ a variety of setups then by bringing in the Raleigh Tamland series, and by hosting gravel rides once a month.
However, this trend is not that new to cycling. In fact if we look back to the iconic images of the grand tours and classic races we find cycling’s early heroes rolling, pushing, grinding and bouncing across pocked coble and dirt roads. I guess that’s just how it was, but we had all but forgotten (mostly) about that until the last few years. Big races like Paris-Roubaix & Strade Bianche tackle some rough terrain for the pros and for the rest of us the growth of events such as Dirty Kanza, Iron Cross & Eager Beaver 100 have been pushing the trend forward.
So, while not that new or unique, it is a growing trend in recreational and competitive cycling that has been gaining even greater momentum recently. Gravel riding is a great alternative to traditional road riding and we at SRB are testing the terrain and discovering more about it in our local area. We are becoming experts at our terrain as we search out as many interesting routes as possible!
So that is where I’m coming from, as I share with you a bit of my story, and resources you can use to learn more. While I am not an expert (yet!), just an enthusiast, I am trying to drum up more gravel converts so they too can learn how awesome the gravel side is.
First things first; the why and how of gravel riding. I came to gravel riding out of curiosity. Throughout most of my time riding hard-top, I was drawn to the mystery and adventure that lay ahead on the ‘forbidden’ gravel roads. As well, the ride leader I found myself becoming was constantly searching for new routes, and roads to link multiple established routes. I also simply took note of the extensive park trail, and rail trail infrastructure at our disposal in Guelph/Wellington and felt compelled to make use of it. Once on the gravel I had found an ease and comfort unlike anything I’ve experienced on a bike. No longer was I feeling threatened by motor vehicles, and the anxiety that had been building with increased traffic volume, and a seemingly growing divide among all of us who share the road. Gravel riding also brought me closer to nature, literally. Whether it is recreational trails or back roads, you come into contact with more wildlife, and are better shielded and shaded by tress and greenery. The whole experience was simply more serene, and just plain old fun.
All of this adventure joy brought me to slapping some 25mm AW3 tires on my carbon road bike, and pushing my limits on the loose surfaces on rare occasion. My next step was a few years on a cyclocross bike which worked really well but had a geometry that was slightly too aggressive as it possessed a head tube meant for racing 45-60 minutes vs slogging along for multiple hours at a lower speed. The cyclocross bike led to retrofitting my steel touring frame, with 40mm tires, disc brakes, drop bars designed for gravel, and I’m in the process of building up some lighter, tubeless, cross-country wheels. My colleagues at SRB possess a total of 3 Raleigh Tamlands now (plus the requisite cross bikes that almost every employee has) so, to say we all ride gravel ... an understatement. Now you don’t have to go to these lengths, but I have to recommend at the very least, that anyone interested in getting out on the gravel have a bike with forgiving geometry and the ability to run no less than 28mm tires.
Gravel with its uneven, loose surfaces can be jarring, and tricky to handle at times. A supple frame constructed of steel, or carbon fibre, is best suited to help reduce the vibration. Aluminum is a great material due to its resilience but make sure you have a carbon fork and PLENTY of room for larger tires. No matter what frame material is, the wider the tires, the better ride quality. Wider tires not only help with traction on the loose surface, but they can also be run at lower pressure than skinny tires, and make the ride significantly more comfortable. While we’re talking comfort I should mention that a bike designed with a taller head tube allows for a more upright, relaxed posture, and will help prevent your arms and back from tiring before your legs do. A nice compact drive train with a 34/46 chainring up front with a 32t cog on the rear will help you spin the hills vs grinding up them.
Over the past couple of years I have had a great deal of help figuring things out as I’ve ventured onto dirt roads and abandoned rail beds. I’ve relied on the expertise of frame builders, mechanics, product reps, and fellow bike retail workers to help guide me along to some extent, but I have found a good wealth of information from a handful of websites and blogs. I’m not going to say a lot about them other than I’ve been able to sort out a great deal of my queries regarding, gear, parts and accessories, and have enjoyed the writers stories of adventure and exploration.
Gravel Riding - http://ridinggravel.com/
Gravel Cyclist - http://www.gravelcyclist.com/
Guitar Ted Productions - http://g-tedproductions.blogspot.ca/
Gravel Bike: Ride everything - http://www.gravelbike.com/
Keep in mind that these are American sites with some Canadian contributors, so you won’t find a anything about local trails/routes, and some of the products they test and mention are not easily accessible. I offer my http://www.mapmyride.com/
routes page as a means for finding some local and not so local routes I’ve traveled or at least designed with the intention to travel. Find ‘playlord’ and you should find that most of my routes are public. Also feel free to stop by the shop if you have questions about gravel bikes, gear or routes. You can even email me at taylor@speedriverbicycle.com with your queries.
Finally, if you want to check out a Shop Gravel Ride, come and join us for our next one, Sunday, August 31. We meet at Speed River Bicycle at 8:30am and roll out at 8:45 for about 50km of multi-surface fun. There is no fee and this is open to anyone with a gravel capable bike. Just shoot me a message at the above email address to let me know you plan on joining the ride.
June 15th, 2016: Saddles and why they matter so much ...
In bike fit saddle comfort, and how the saddle supports the pelvis, is quite possibly the most important aspect of a bike fit. No one single area can create comfort and power or discomfort and weakness quite like a poor relationship between your saddle and your body.
We have been working with alot of clients in the fit studio and across the board we hear the following complaints:
- my low back is sore/tight from ... km on
- my neck is sore and cranky from ... km on
- my hands are sore and numb from ... km on
- my groin is sore and number from ... km on
These complaints often come from people who, for all intents and purposes, look like they are set up fairly well on the bike. So, the fit looks okay but they are uncomfortable ... why?
The above image is, 95% of the time, the reason all of those problems arise. By sitting on your perineal area your create a cascade effect that worsens the longer you ride. This is the pattern we typically see (and, keep in mind this is grossly generalized but still applicable to a large portion of the cycling population):
- pressure begins to build in perineal area, the riders body subconsciously creates a posterior pelvic tilt (rolls the pelvis back off of the perineum) t0 alleviate pressure
- posterior pelvic tilt creates flexion in the lumbar spine (rounds the low back) which starts to create strain in the low back
- flexion in the lumbar spine moves on up into the mid and thoracic spine and creates a situation where the bike starts to feel longer than before (more on this down the line...) as you arch away from the bars
- flexion in thoracic spine causes greater extension in the cervical spine (cranks your head up so you can see) which makes for a sore neck/tight upper back
- the sensation of the bike getting longer and the need to relieve the pressure on the perineum causes the rider to lock out their arms and jut their shoulders forward to bear more weight on the hands and less on the perineum. The action of 'pushing the bars away' with your hands puts excessive weight on the hands and as a result, numbness/discomfort begins to grow at the hands
- cycle continues ad nauseum until ride ends
If your bike is the proper size for you and you have the requisite mobility and flexibility to ride a road/triathlon bike something as simple as a poor saddle can cause all of those problems. How can we remedy those problems? Well, to grossly generalize again ...
We properly support the pelvis and remove the excess perineal pressure. By doing that the rider can then ...
- hinge at the hips and roll their pelvis anteriorly (forward) bringing in more balance via recruiting the glutes and hamstrings
- hinging at the hips and keeping a neutral spine reduces strain on the lumbar spine (less back pain) and keeps a straight line through the top of the head down through the bottom of the spine thus reducing cervical spine over extension and ... less neck pain.
- hinging and keeping a neutral spine effectively brings the rider closer to the bars thus allowing for the shoulders to be relaxed and the hands to be placed gently on the bar reducing hand discomfort. Not trying to escape perineal pressure also reduces the need to overload the hands.
- lastly, not sitting on the perineum allows the pelvis to move properly and allows for greater stability and power at the pedal.
If any of this sounds like you and you are nodding your head in agreement send us an email and make an appointment for a fit. You should not, and do not have to, be uncomfortable while riding your bike ... you deserve to be comfortable on your bike!
May 12th, 2016: A short piece on shorts ... and bibs ...
If you spend a decent amount of time in the saddle you will develop strong opinions on what you should wear to maximize your comfort on the bike. I have worn many (MANY ... I have owned over 60 pairs of bibs in my short existence) pairs of bib shorts so I come to this review with alot of experience and some strong opinions. I am also recently back to logging a decent amount of weekly miles after a lay-off of sorts so my posterior needs the best (as it just isn't conditioned like it used to be!).
Bontrager clothing has improved leaps and bounds over the past few years to become our #1 selling brand in the store and while last years shorts & jerseys were fantastic, this year Bontrager has come out with a new line of shorts. They have completely redesigned their chamois using their pressure mapping technology and dubbed it 'inform bio-dynamic technology'. They've also changed some of the fabrics and completely re-done the naming system to be in line w/ their helmets, shoes etc... I managed to get my hands on a pair a few months ago and after 500 or so road, gravel, trail & race kms I am ready to give them a review.
First Impression
So, to start, I'm a very traditional size medium. 5'8, 158lbs and most medium products fit me quite while. I have been having trouble lately with some shorts due to narrow leg grippers that are just too tight so, I was interested to see what these bibs brought to the table.
First things first, quality seemed spot on. No messy stitches or loose threads and the profila fabric just feels ... nice. The bib straps are very flat, no seams and quite smooth ... might seem weird I'm commenting on this but, 3+ hours in the saddle and this is important (think, no chafe!). Chamois looked like a chamois ... can't say much more about that.
Putting them on I immediately noticed they didn't have a traditional narrow gripper but a larger compression band which I appreciated greatly. They held their position well but didn't grab excessively in a narrow area, which is nice. The chamois was not too thin or too thick (just right ...) for wandering about. Mind you, hadn't tried them on the bike yet but everything seemed great and I wasn't waddling around with a super thick chamois.
On the bike
Best. Shorts. I've. Ridden.
Bib straps, nary a chafe to be found and you really don't know they are there. They hold everything where it should be and then ... disappear. Wonderful.
Leg gripper keeps itself in place (no riding up) but isn't too tight. With a 9.5" inseam they were just the right length (I dislike an excessively long short) and stayed put.
Sufficient panelling (lots of them) meant no bunching, no riding and no chafing (you see a theme ... chafing = bad). The shorts moved with you well enough that, well, you just forget they are there.
The chamois was excellent. The longest ride I've done on it is 3 hours but I did put it through Steaming Nostril and Paris to Ancaster ... both fairly rough, long semi-offroad road races and my posterior was happy as a clam. Not so thick that I felt I was floating around on the saddle and not too thin as to not make a difference. As I said before ... just right.
Suffice to say my single pair isn't enough. I wash them after every ride and insist on wearing them all the time. If you are in the market for a great pair of bib shorts ... these could be them!
As a note: My wife and a few of our female employees are wearing the Anara and Meraj shorts by Bontrager and I have heard the exact same reports. Fact of the matter, Bontrager knocked it out of the park with this line of shorts.
April 21st, 2016: The power of electric assist bikes ...
We love bikes.
We love going everywhere by bike. There is something liberating? Amazing? Fun? About pushing yourself around with your own two legs and interacting with your community.
We also love helping people become cyclists or continue to be cyclists ... which is where our love for electric assist bikes really comes in.
While there are a whole host of people who are interested in electric assist bikes there are a few common reasons we see that make the electric assist bike the best choice.
Commonly we see a decision that is based on fitness. The individual wants to ride to work/grocery store/gym etc... but doesn't feel confident they can repeatedly make the trip solely under their own power. Sure, they could maybe make it there ... but back? This is where the assist bike steps in and allows for varying degrees of 'help' based on needs.
- Hills are tough and really sap the legs? You can use a low level assist to add to your pedal stroke and help you power over the hills.
- Time is an issue and need to go faster than you can achieve on your own? Use a higher level of assist and zip along at 32km/h using your leg power and the power of the li-ion battery.
- Want to go further than you usually do? Low level assist will allow you to stretch out the ride and use the same amount of effort/energy to go a further distance.
![]()
Another strong reason for the electric assist is a lack of shower/cleaning facilities at work. You want to ride to work but you know if you do it entirely under your own power you could end up a bit sweaty, would have to bring a change of clothes etc... Using the assist feature you can power along at 32km/h putting as much or little effort in as you would like. Stay sweat and spandex free on the way to work and then when you want to work a bit harder on the way home ... work harder! Turn the assist down, or off, and make your way home.
The RV/Cottage goer is another perfect candidate for the electric assist. Drop anchor and set up and camp, hop on the bike and adventure and explore. You don't have to worry about the terrain because with the assist you can confidently get up any hill or, if you get a bit lost, you don't have to worry about running out of energy thanks to the assist.
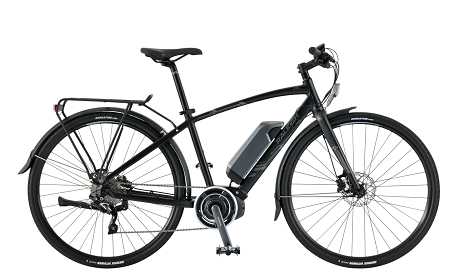
And we have a great selection of mid-drive equipped e-bikes in stock. The step through Raleigh Sprite is a perfect city bike that is easy to get on and off of. The Raleigh Misceo and Trek Conduit are the perfect get around bikes. Racks, fenders and kickstand make this the best commuter option. The Trek Lift + with its 26" wheels and larger tires is a great bike for the campground or cottage with the greater tire volume taking the edge off the rough roads.
And, we are e-bike experts. We have been selling and servicing electric assist bikes for over 6 years and as a Shimano SSC (service center) we are uniquely capable and qualified to service your Shimano StEPS systems.
Stop in, try one out. See what it is about!
April 10th, 2016: Missed a month so some updates ...
Well, the end of February and March were a little bit crazy. The spring like weather hit us early and had us running earlier than usual which is fantastic. Then April decided to snow on our parade a bit which has let us sit back and catch our breath a bit. Not the worst thing but sometimes mentally challenging to switch gears like that in the midst of a busy spell.
In the backshop: We are turning around repairs within a day currently which, for April, is amazingly fast. We have a phenomenal group working in the shop ... as many as 5 mechanics at a time ... so we are primed and ready to get your bike back up and running quickly! This turnaround time will most likely push out a bit when the warmth comes back to us so get in and and you will get back on the bike very quickly.
On the floor: The new clothing from Bontrager, Icebreaker and Sugoi is in and it is fantastic. I have been wearing the new Velocis bibs as well as the Specter jersey from Bontrager and they have been amazing. By far the best bib shorts I have ever purchased. The confidence of knowing that if I didn't like them I have 30 days to return them ... no brainer.
In the fit studio: We have restocked on Currexsole insoles as well as wedges and shims from BikeFit. Proper support at the foot and the seat are incredibly important and not to be underestimated.
Lately I have been noticing that when a client comes in and is using the 'wrong saddle' (for them) they have a strong tendency to sit off to one side of the saddle. To the client this shifted seating position, if used for sufficient time, feels 'square' or 'straight' on the saddle. Using pressure mapping we get an appropriate saddle on the bike and then work to develop a balanced (pressure 50/50 left/right) sitting strategy.

In this image the shifted (or initial) position is on the right and our new saddle with corrected position is on the left. By correcting this we increase comfort and we ensure that each leg is acting the 'same length'. When we are shifted this drastically we end up with an effectively short leg and an effectively long leg .... not ideal!
The most interesting part of this is that generally the client feels that they are sitting straight ... and when we correct them they 'feel crooked' on the saddle. Goes to show that having a fit professional look at your on bike position can be VERY beneficial.
Riding: Kelly and I attended the 'steaming nostril' gravel road race which was put on by the Waterloo CC. Fantastic event where we both had a ton of fun. It is a mass start event that covers 65-70 km of primarly gravel road with a smattering of paved road, farm trail and rail trail.
The beauty of the mass start event is that if you don't want to race, you don't have to. If you want to race, you can. You simply line up with 300 fellow cyclists (in the -10 degree weather) and do what you will. If the event had happened 2 weeks earlier we would have been blessed with warmth, sun and dry roads. As it turned out we had cold, wind and wet roads (plus a snow storm the entire time) which just added to the fun!

So, while this hasn't been a traditional start to the season by anymeans it has been fun because ... well ... we are dealing in bikes here!
Feb 13th, 2016: Change things up, movement wise, reap the benefits ...
As cyclists, runners and swimmers we spend the majority of our time moving in the sagittal plane. When we do our strength work we tend to squat, deadlift, swing, press etc... which are fantastic but, also, in the sagittal plane.
Quick question: What happens when you stop training for 2-3 weeks? We all know the answer to this. Our super efficient (some would say miserly) body decides to stop squandering its resources on silly things like extra red blood cells and you slowly but surely get ... less ... fit. Simply put, if you don't use it, you lose it.
Well, this also applies to your body and how your joints function. If all we do is move in the sagittal plane ... if all we do is run, swim & bike we will slowly lose the ability to move properly. Yeah, I said properly. If we don't regularly move our limbs & joints through a full range of motion and tell our body that this is range we want ... we lose it.
So what, I'm not in cirque ... who cares? Well, everyone should care about how well their joints function and how well they move but, to put it in performance terms, you will lose performace as you lose the ability to move well. You will open yourself to injury as your movement quality deteriorates.
Knees splaying out at the top of the pedal stroke and you have uncomfortable feet/knees? Could be a lack of hip internal rotation.
Low back discomfort? Could be an inability to move your hips and spine independently ... the inability to control your pelvis on the bike.
There are more but I'm sure you get the point. The goal isn't to be a cirque performer, it is to create resilience and robustness in your body ... a resilience that will allow you to train how you want and not be laid up by injury. The goal is to learn to control your body and tell it what you want out of it. The ability to move each joint independently through a full range of motion. Dr. Andreo Spina puts it as wanting "articular INDEPENDENCE before articular INTERDEPENDENCE". Make sense?
So how do we do this? It is pretty simple actually (but simple doesn't mean easy). I recently attended an excellent seminar called "functional range conditioning" and the base of FRC is a simple process called CARS (controlled articular rotations). CARS are defined as "Active rotational movements at the outer limits of articular motion". The following link explains CARS quite well and provides a few videos that will show you what they are.
Simply put, you control how well (or how poorly) your body moves. That controls how well you do in your chosen sport. Put in the effort, reap the benefits.
And, if you have any questions about this feel free to email me at tim@speedriverbicycle.com or drop by the shop and chat!
February 4th, 2016: Spring is coming, be prepared ...
Okay, it is a bit off still but, it is closer than it is further away. Right? Right?
And with this freaky weather we have been experiencing you cannot help wanting to be out on the roads, trails etc... in short sleeves. So let's make sure our bikes are ready to roll as soon as you want them to. We have a simple bullet list to help you be ready when the weather is ...
- get down to the shop now and get 15% off labor. Let us make sure the bike is ready with the added bonus of no busy season wait time. And, I know, not much of a hint but it will be the easiest route to follow
- check your tires: Will they hold air? If not, get them fixed in advance or make sure you have what you need to fix them.
- rattle test: I always like to subject my bike to a simple (low level) drop test and listen to the noises that follow. Outside of chain slap I really shouldn't hear alot going on so if I head a buzz, clunk, thud etc... I know I need to figure out whats going on.
- rock test: A great way of assessing bearing systems. Grab the wheel, rock it side to side. Grab the front brake, turn the wheel sideways and rock it back and forth. Grab each crank arm and see if theh BB rocks back and forth at all. If you get any 'play' or movement in the bearings when doing this simple test you know something needs a)tightening or b)replacing.
- check your chain: Is it yellow or orange? If it is it might live with a cleaning & lubrication or it might simply need replacing. But make sure it doesn't have any stiff links and can move smoothly along the gears.
- give your brakes a real squeeze: And make sure they work. Double check the pad life ... these are the things that stop you and if you put it away on the cusp of not really working ... not so good.
- check your helmet: look for cranks, dents, cuts or anything that compromises the structural integrity of the helmet. If it is compromised, replace it.
So these are VERY simple things you can check to see if your bike is road worthy. If you pass all of these items (no rattles, no rocking, chain isn't yellow etc...) get out when the weather turns! If you don't pass these items ... get it fixed sooner than later.
I am really looking forward to that first road ride where I completely underestimate how cold it is (ex. where I am WAY too optimistic for March) and I freeze myself by dressing inappropriately. It happens once every year ...
January 15th, 2016: Taylors clothing review
Winter has finally arrived, and with it, a crazy ambition to bundle up and ride our fat-tired bicycles on snowy trails at sub-zero temperatures. We do what we have to, to stay active outdoors when the snow falls, and a big part it is dressing weather and activity appropriate. Sure, we could throw on a pair of snow pants and a parka, snowmobile gloves and a polar-fleece toque, but unless we are facing -30 or lower temperatures, we are going to roast and be limited by the bulk. With that in mind, our running tights and vest aren’t going to cut it either. There are well designed garments out there that will allow your body to move as it needs to and keep you warm while you’re sweating it out on the bike. Here’s a little review of some of the stuff I’ve worn out for the last few rides.
The last couple of days have been pretty consistent weather-wise with slight variations. Tuesday and Wednesday evening were chilly at -19, with falling snow, and blustery winds. When you’re in the trees the wind doesn’t play much of a factor, but as soon you pop out, that wind blasts you. It is a delicate balance to protect yourself from the wind, and not overheat in the bush. The combination of garments that I have worn for the last two nights have been very effective.
The base layer is perhaps the most crucial for regulating your body's temperature. You’re going to sweat so you’re going to need something to keep you warm while you’re wet. An effective base layer will dump heat, wick moisture, stay warm when wet, and dry quickly. I rely on Icebreaker merino wool for this. Starting at the top, the Pocket Hat ($29.99 MSRP) and Apex Chute ($39.99 MSRP) are great for keeping the head, face and neck warm. The Pocket Hat easily fits under the helmet and the Apex Chute is a versatile garment that can cover everything or nothing. I know people like a balaclava but I prefer the chute and hat combo so that I’m not committed to the full coverage when I start to heat up on the climbs. The chute can simply hang out on your neck, or be pulled up to cover your chin, mouth, nose, and even your ear lobes. For managing temperature and moisture on my core I rely on Icebreaker Bodyfit Zone products. A Zone Long Sleeve Crew ($119.99 MSRP) on top and a pair of Zone Leggings ($119.99 MSRP) on the bottom. Both garments feature multiple panels of material that move with your body, and different levels of fabric density to provide zone temperature control. These garments use lighter merino mesh to dump heat in the backsides, crotch, and armpits, and provide extra insulation in the front. Note that the leggings are a ¾ cut that integrate perfectly with a cozy pair of Mens Ski+ Medium Over The Calf socks ($33.99 MSRP), to keep the lower legs and feet toasty warm.
With your next-to-skin clothing keeping you moisture and temperature regulated, your mid and outer layers are essential for providing insulation and protection from the elements. There are lot of mid and outer layering options that are contingent on the variability of the weather. But to keep it simple I’ll just give the goods on what worked for a windy, snowy night ride and a warmer morning ride.
Let me begin by saying, “I don’t like bulk!” It adds extra weight and inhibits body movement, so the plan is to keep it as light and lean as possible. For the cold, blustery night ride sitting around -19, I went for a Bontrager RXL Thermal Jersey ($149.99 MSRP), Bontrager Velocis Stormshell Jacket ($239.99 MSRP) and Bontrager RXL Softshell bib tights ($169.99 MSRP). The jersey did a fantastic job of wicking moisture out from my core while providing just the right amount of insulation. I was warm when I was cranking out the watts in the bush but not overheating. The Velocis jacket does an amazing job at keeping the wind out, and the snow instantly falls off rather than sitting around and melting into the jacket. This jacket also does a pretty decent job of breathing and letting out unneeded heat. I should mention this jacket has also been bombproof while being subjected torrential rains on the west coast of Ireland. Covering my lower regions is an ingenious garment. The RXL Softshell bib tights feature wind and waterproof paneling on the frontside, and heat dumping, moisture wicking, water resistant paneling on the back side with a bib that comes up to your mid-chest and back to keep the snow and cold out. This product is also available with a built-in chamois, but on cold rides like this I like the extra insulation from the merino leggings, and I wouldn’t want that to come between me and my chamois. In this case I opt for a pair of Sugoi RC Pro Liner ($55 MSRP) to give the comfort and support I require from a chamois. The RC Pro Liner is essentially a pair of mesh boxer briefs with an RC Race chamois built in. They snug up perfectly under the merino tights.
For the morning ride I opted for a slight variation. I kept the base layer, and bottoms exactly the same but due to that lack of wind and warmer temperature at -13, I went for a lighter mid and outer layer. There was no need for the Velocis shell with the wind only kicking up to 5km and nothing falling from the sky, so I went for the 260 gm Icebreaker Tech Top Long Sleeve Crew ($124.99 MSRP) as my mid layer with the aforementioned RXL Jersey as my outer layer. To be honest I found this to be just a touch too much, but I’d rather be warm then to come up a little short and underdress. I think a lighter 150 gm or 200 gm merino piece would have been a sufficient midlayer.
Covering our core and keeping warm is usually pretty easy and doesn't require hi-tech active garments (but they sure make it easier and far more comfortable), however keeping your extremities warm is a whole other story. Proper gloves/mitts and boots are key to enjoying the ride. Once your fingers and/or toes are freezing your enjoyment level can drop immensely. A winter cycling glove is optimized for exactly that, cycling in the winter. The Sugoi Zap Split Finger Glove ($80 MSRP) provide a wind and water resistant backing, gel padding to provide comfort for your hands, and venting so your hands don’t overheat. The split finger design keeps your index and middle, and ring and pinky fingers together for extra warmth that a standard glove can’t provide, while allowing extra dexterity for shifting and braking that a regular mitt can’t. As for boots let it be known that most winter cycling boots don’t so much keep your feet warm when the thermometer nears -20, as they more so keep your feet less cold. The problem is that cycling footwear requires having holes in the outer sole to allow us to mount our cleats. This gives way to heat loss by allowing cold air into the boot. I’m using Northwave Celsius Arctic 2 GTX winter boots ($289.99 MSRP)this year. After wearing out a pair of $70-$100 dollar shoe covers every year, that are not effective when we get to -10, I’ve decided to invest in something that will withstand the torment of the winter trail and keep my feet from completely freezing for years to come. I used to go out knowing that I had about 45 minutes before it became unbearable. For the maiden voyage in these boots I noticed my toes began to get cool around the 45 minute mark, and 20 minutes later I was thinking “alright now they are cold”, but fortunately at that point I was home. I went out in the same conditions the following night and added a layer of tinfoil under the insole to reflect the cold air out and the warm air in, as well act as a moisture barrier between the boot and insole. This made a remarkable difference and I lasted 90 minutes before I noticed my toes getting cold. Having a successful result with the tinfoil I went out and splurged $6.99 on a pair of insulated foil insoles from Dimar Shoes that I’ll slip under the insole that came with the boots. I’m grateful to have a little extra volume in the boots for this ;)
I know that is a lot to take in, but it’s worth it. The warmth, function, and comfort that good, winter cycling apparel provides is essential to the enjoyment of the ride. It's going make you wanna get out more which in turn will make you feel better. Just think, if everyone did this, and felt better, the world would be a better place. Remember, the season never ends when you’re dressed appropriately, so get outside, have fun, and enjoy life on a bike.
November 28, 2015: Sitting strategies and when to change the saddle ...
Over the past two weeks we have had two interesting fits come through the studio that, had we not used pressure mapping and had we gone off of some assumptions (never good), we might have made the wrong decisions as the choices we made were the opposite of what could have been assumed based upon rider sensations. Read on ...
James has a long history of mountain and cyclocross riding. He has reported numbness and discomfort on extended cross rides and has recently purchased a new Emonda ALR and wants to be comfortable and able to log some trainer miles this winter.
Now, James reports excessive soft tissue pressure and on his 'cross bike he is decently positioned so, one would often assume, change out the saddle to make improvements. But with pressure mapping we can look at it quite a bit closer than that...
The image below, not so good. A road saddle is not intended to be front loaded to this degree and it is no wonder that James is experiencing discomfort. Not only is he weighted on the front he is essentially 'bouncing' on his soft tissue and his pelvic movement is far from optimal which costs him in power and efficiency (oh, and comfort).
But what else does this tell me? It tells me that James sitting strategy is not optimal for this bike and we won't make an equipment change until we get him sitting where the saddle was designed to be sat upon.
We start at the feet (as he has new shoes and cleats) to get them situated properly. We then work up to the hips and then the hands. We go back and forth here a few times dialing things in. As it proceeds we notice that James is the type of cyclist who, no matter where you move the saddle, he will sit in the same position (on the nose). So we spend some quality time working on where to sit on the saddle and how to sit on the saddle. We know we have started to get somewhere when the excessive flexion in his lower back begins to receed. Eventually we end up with the image below.
Quite a bit better! He is square on the saddle and his pevlis is beginning to display proper movement patterns. As his preferred strategy was vastly different it will take him some time to adapt but, as he does, he will continue to get more comfortable and more powerful. As with all fit clients he is sent home and asked to report how he feels over time and if there is a need for tweaks down the road, to set up an appointment and come in!
For our second client:
Jeff rides alot and has for quite some time. Cyclocross, ironman, distance cycling ... you name it. He had recently purchased a new bike and knew that it just wasn't right. The frame size, spot on, but the fit (or, ass and hands in space) was not right. He was positioned far back on the bike making him reach a good distance to what appeared to be a manageable set up. He has reported no saddle discomfort as he had switched out the stock saddle for a saddle that he felt worked really well for him in the past.
When we start we see some things such as excessive flaring of the left knee and a 'pawing' pedalling style that are markers that something is up but, nothing that says 'New Saddle'. Below is the initial view of Jeff on the saddle.
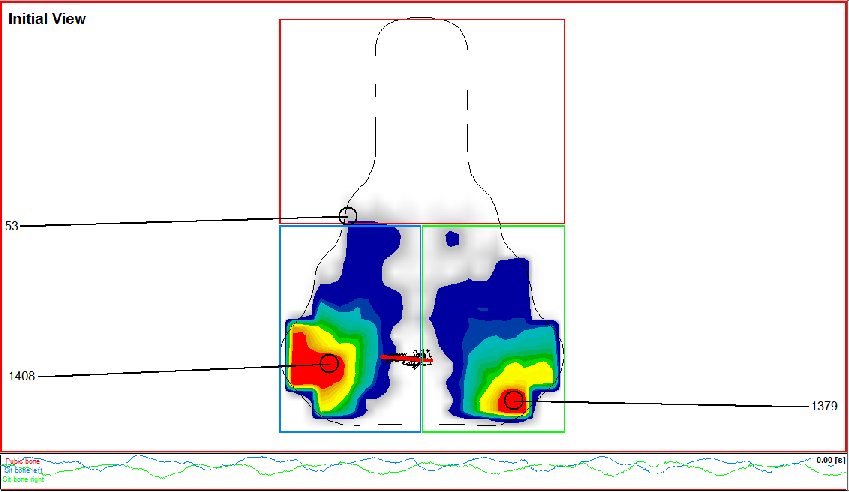
Interesting pressure map. As a note, 1400mbar of pressure is sub optimal but, if anywhere can handle it, it is the 'sit bones'. As he can handle that pressure it is no wonder he doesn't report soft tissue discomfort as there is literally no pressure on the forward 2/3 of the saddle. But, as this is more the strategy for a hybrid or upright bike, we start to see it as a cause of the other issues (knee flare, pawing, hand discomfort). So, much like James we start at the feet, move up to the hips and then out to the hands and work on his sitting strategy. As we start to position Jeff properly on the saddle it becomes apparent why he sits on it the way he does.
If Jeff were to sit on this saddle as it was intended he would suffer undue soft tissue discomfort! So, we try a new saddle and make a few more adjustments.

Much better. We are more square on the saddle and the pelvis is showing better movement as a whole. Additionally the left knee has moved back towards the midline, the 'pawing' style of pedalling has gone away and we have the hands nice and comfortable.
In this instance the client was so far back, and had their pelvis rolled back so far to avoid pressure, that it was causing a host of up and downstream issues. But the client did not report saddle discomfort so ... how would we know to attempt to change the saddle?
In both of this fits we came up with a solution that was the opposite to what might have been assumed from client reported discomfort. We could do this in a methodical fashion that required no guess work because we had the right tools to approach this scientifically. We had numbers and images that would guide us in making educated decisions ... the way bike fit should be!
And, as a note, this is THE time to get a bikefit. If you plan on logging trainer miles or had discomfort on the bike this season get in now. Get a fit, get started on the miles and then come back pre-season for whatever adjustments are necessary. This will give you time to 'earn' the fit that you desire for your goals.
November 14th, 2015: Size before you buy ... fit first
When purchasing a bicycle, especially a road bike and tri bike, you need to think about bicyle size, position and fit, first and foremost.
Road cycling is highly repetitious and it lacks the constant change of position that occurs in mountain biking so getting the right position, and the right size frame, is incredibly important. Tri bikes, even more so, due to the aggressive position you are put in coupled with the demands you place upon yourself once you get off the bike.
When thinking 'new bike' you want to take a look at where your flexibility, mobility and stability are now and think about what your goals are for the short term and the long term.
For example: I am very interested in triathlon and want to get a tri bike for next years sprint distance tri. Long term I am interested in Olympic and then maybe a half Ironman. Those are my goals, next we assess my flexibility in a broad sense. A simple forward bend test shows that I have less than optimal hip and lumbar flexion (something like image 2).
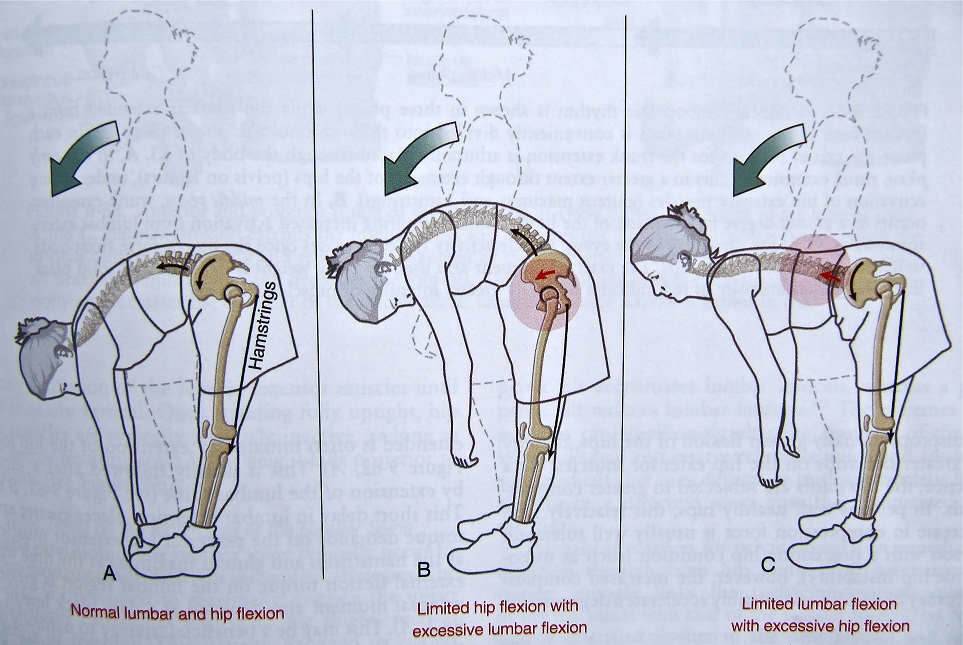
So we decide to check my active hamstring length and, not so surprisingly, I don't have much going on in that category either.
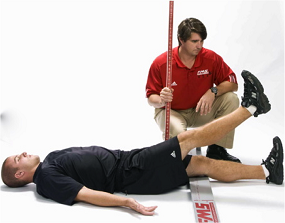
It appears I am as flexible as a breadstick (and not a soft one at that) which leads to the discussion, is a tri bike the right bike for me right now? And the reality is, probably not. We go through a few other tests and then, because we can, we use our size cycle to mock up a tri bike and assess how I would look on the bike. These all confirm that ideally I am suited for an endurance road bike with a more relaxed riding position.
In the end I choose an endurance road bike that incorporates a slightly shorter top tube (less reach) and a slightly higher headtube (more stack) and vow to work on my weaknesses so that I can achieve the necessary position to ride a very aggressive bike for an extended period of time. While this bike is less aerodynamic, the reality is that I didn't meet the requirements for the tri bike and would have been very non-aero anyways. As well, if I had gone forward with it I could have opened myself to injury, slower run times and slower bike times because I was exceeding my bodies abilities.
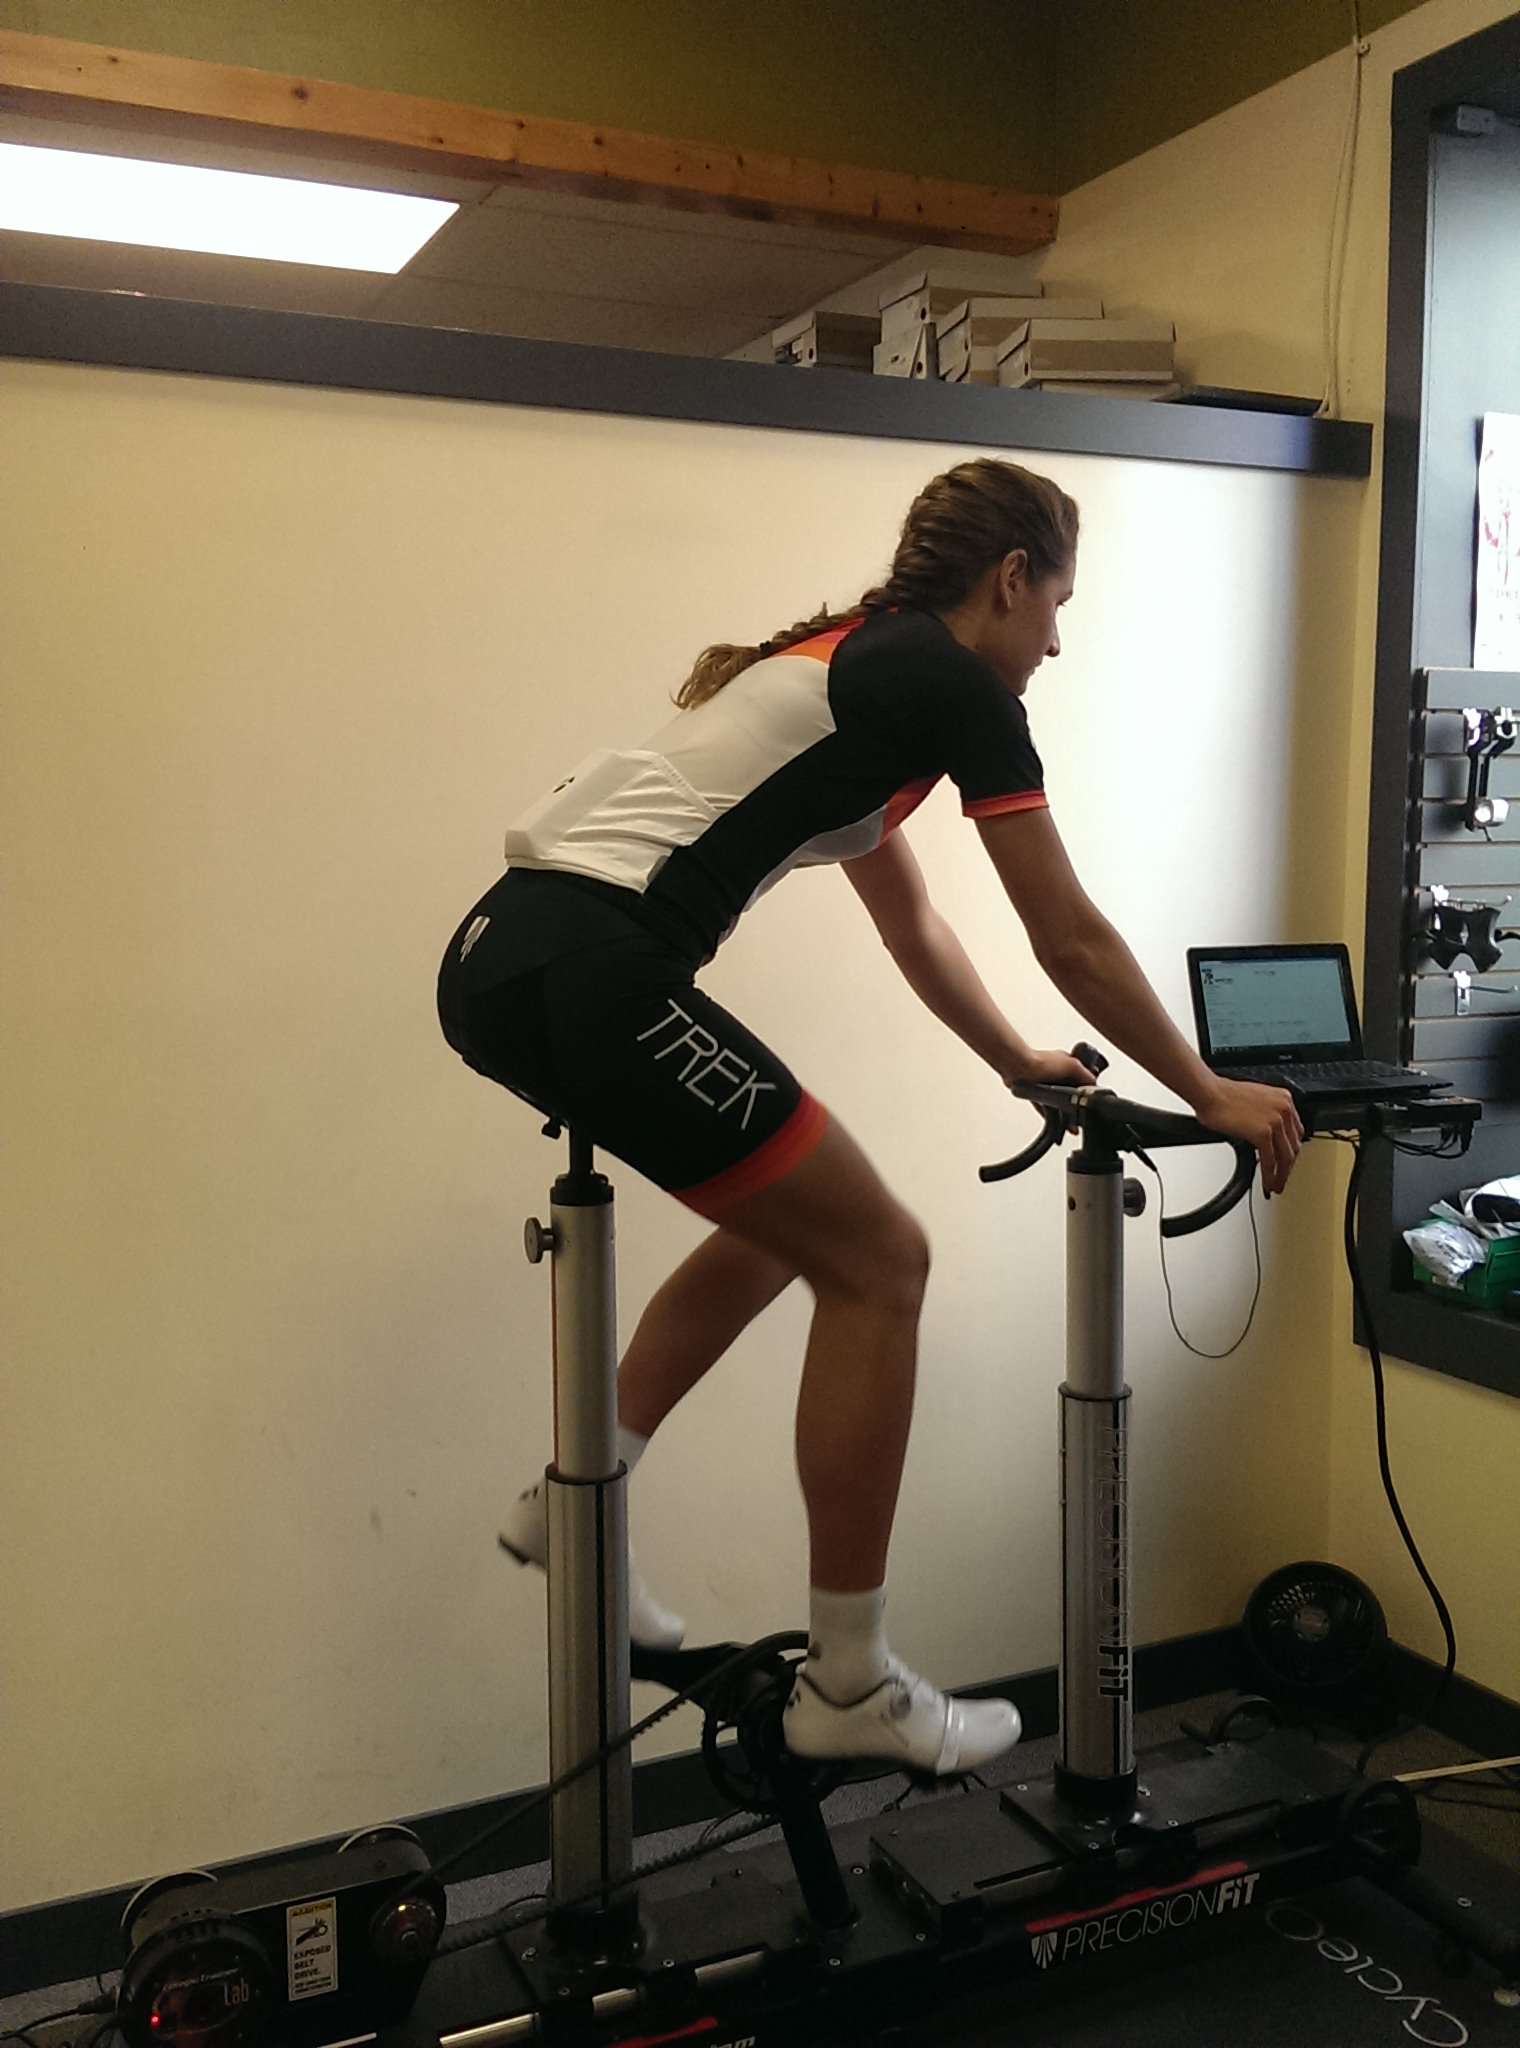
So, that is a brief, and simplified, outline of the thought process that would go into selecting a frame. Think of your goals and activities, get an honest assessment as to where you stand physically and how it relates to your desired bike and then go through a few bike options and sizes on a size cycle so you know what to expect, position wise. Know that if you don't fit your ideal bike (aggressive road frame, tri bike) that doesn't mean you can't ever get that position, it simply means you have some work ahead of you to improve your body.
Take a fit first mentality when you are purchasing a new bike and you cannot go wrong. If you have any questions please send us an email or stop in to chat. We can run you through a bit of our process and outline why the size cycle is such a critical tool when selecting the right bike.
October 22nd, 2015: The perfect mid-layer jacket
The Ice Breaker Helix jacket ...
http://speedriverbicycle.com/product/icebreaker-helix-ls-zip-6659.htm
The Jacket I have been searching for along time.
I have needed a jacket that would cut the early morning chill while I pull my son to daycare (fall & spring) on the bike. The jacket has to have insulation but also block the majority of the wind and if there is a light drizzle, not get soaked. 7am can be pretty chilly and I typically 'feel' the cold more at that time of day so being comfortable is important to me. Yeah, I'm soft.
I also wanted the jacket to be light weight and not too bulky because I wear a backpack full of my boys stuff and an oversized winter jacket was awkward for shoulder checking and riding in general. So, yeah, I'm picky.
The Helix has been perfect. Wind resistant and lightly water resistant with a fantastic merino loft insulation the contains and holds onto the heat I generate perfectly. 10 pedal strokes into my ride I'm warm and thanks to the stretch panels and venting I don't overheat and end up a sweaty mess.
The thumb loops are nice for cyclists and if you are wearing it as a midlayer under a shell jacket on a really cold day. They aren't for everyone but I have found them to be a great help in keeping warm on the colder mornings.
I look forward to the colder days (okay, I don't really but, for the sake of reviewing a product ... I do) so I can see how it works as my winter mid-layer combined with a shell over top.
October 10th, 2015: Fall thoughts ...
Fall is definitely here and it is dark early and dark late but don't let that slow your roll. We have been experimenting with a whole HOST of lights this year and have some great suggestions for the commuter, the road cyclist and the trail rider.
Commuter: The commuter needs a combination of being SEEN and SEEING, never mind the fact we need to use lights by law. We have some great new lights in ...
- Be Seen: The 2'Fer from Blackburn is pretty awesome as you can use it on the front (60 lumens) or on the rear (20 lumens) depending on your need. Locks onto some very simple mounts or onto your bag.
- See: The Ion 700 is bright ... 700 lumens light. Strobe & solid with a variety of seetings this is adequate as a trail light (we have helmet mounts) but will illuminate any road imperfections. The rear light 'twin' of this light is the Flare R ... 65 lumens of incredible rear light that is going to keep you seen for sure. This light is bright enough to work as a day time light letting vehicles see you from over a kilometer away!
Road/Cyclocross/Trail: If you are heading out onto darker roads/mixed surface rides or simply hitting the trails you need to see and be seen. You cannot go get a cheap set of lights and expect to be safe/see what you need to see. So for this category, it is simply SEE.
- See: The Ion 700 is bright ... 700 lumens light and it works darn well. With the new helmet mounts in stock you can use it effectively on the trail. What is brighter than 700 lumens? 1500 lumens of head mounted awesomeness in the form of the Seca 1500. Perfect for the trails, rail trails and roads this will have you seeing and being seen. Be safe with these lights.
- The rear lights of choice are numerous ... the Flare R is fantastic as is the Central 20 rear light from Blackburn. Ultra bright, lots of different modes and USB rechargeable.
September 3rd, 2015: Thoughts from the field ...
This is really going to be a random assortment of thoughts that have entered my head in the last few days ... as a result of a summer full of riding, towing child, working, fitting etc...
- This is from last night: If you are going to use your CX bike as a mountain bike (and we do ... ask Jon Prosser) it would behoove you to run larger tyres (bigger than UCI legal ... I'm loving 38s) and run them tubeless. This setup isn't exactly 'race' but it is so much fun so who really cares? Works on the trail, works on the road, works on grass and even works when Mike decides we should ride through the volleyball courts.
- As is this: Try a fatbike out. Jon, our died in the wool roadie has been out the past two nights on the demo and the only way the grin on his face could get bigger is if his face got bigger. Seriously. It is a ton of fun and can really extend the season ... or just let you ride things you might not be able to without monster truck tyres.
- Inflate the tyres on your chariot: I am always topping up the commuter, the road bike etc... but the chariot, I just plain forget. So when I am hauling 30lb worth of child around town wondering ... why so slow Tim? Why so slow? It is because of the 5 psi in the tyres. That's why. And they are just begging for a pinch flat.
- Maintain your chariot like you would your bike: They aren't inexpensive ... in some cases they can be worth more than the bike that is pulling them. And they DO have moving parts that need TLC just like your bike. So do yourself a favour and check the axles, inflate the tyres, clean up the rust etc... because it will work alot better if you do.
- If you are uncomfortable on the bike: unless the bike is the complete wrong size for you, chances are, you don't need to be uncomfortable. Fittings, and what we REALLY do in the fitting, vary from person to person. Some are wholesale over hauls, some are minor tweaks and adjustments ... most are a mix of those two options. What it always is, is an expert set of eyes giving you an unbiased opinion on what could be reducing your comfort, performance and ultimately your fun. It doesn't hurt to ask ... but sometimes it hurts not to.
- Fall is a great time for bike fit: Most fits happen in the spring ... and a large amount happen really close to a goal event. The best time to get a fit is now. You are fit, you have a whole season behind you and you know what is working and what isn't. You are heading into the time of year where you can back off the intensity and let the body adapt to a fit. You are also heading into the time where you could delve into some recommended exercises and work on posture so that you are raring to go come spring. Long story short ... get fit in the fall/winter and then prior to the long miles you get a post fit check up. That's the best way in my opinion.
And that is about all we have today. Have a great day and enjoy the September riding!
May 30th: New products in the fit studio!
We take fit very seriously at Speed River Bicycle. Over the years we have made considerable investments in education and equipment to make sure we can provide the best fit possible. We also spend alot of time looking into products that can help make you happier on the bike, so, here is a rundown of some products we have 'curated' to make the fit experience the best it can be.
Saddles:
Bontrager Saddles: We believe they are some of the best on the market and when coupled with a 30 day guarantee you can't go wrong. The Paradigm R & RL as well as the Ajna Elite have show very well with the pressure mapping technology!
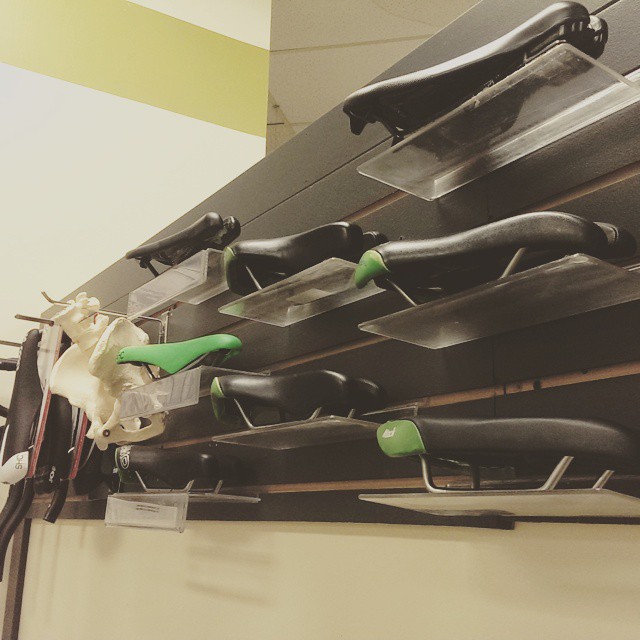 Cobb Saddles: These are brand new to the store. We have 5 demo saddles (JOF 55, SHC, PLUS & more...) and saddles in stock as well. They have mapped very well and they have demo'd excellently out on the road. If you have soft tissue ... issues, come check these out.
Adamo Saddles: A classic for the Tri crowd we have 5 demo models in stock ready to try.
Insoles:
Currex Sole: A proper insole can work wonders in a bike fit by stabilizing the foot, providing support to the arch and providing adequate padding under the metatarsal area. These insoles come in 3 different heights and 6 sizes per height giving us 18 different options to choose from. If you are getting medial foot pain, 'hot foot' or even knee pain it is worth looking into a good pair of supportive insoles!
Shoes:
Two brands was good, three brands is better! We now carry Shimano, Bontrager and Giro shoes. Each brand has a unique last and shape which means we are pretty much guaranteed to find a shoe to fit your feet!
Shimano Shoes: A new last technology (dynalast) combined with fore/aft adjustable cleat positioning makes the Shimano option strong. E widths, half sizes and the most durable product on the market.
Bontrager Shoes: New BOA retention on the Specter and Velocis road shoes, adjustable fore/aft road cleat positioning, light weight and a roomy toebox make the new offerings from Bontrager a great fit. If you find Shimano too wide and Giro too narrow ... well, these might just do it!
Giro Shoes: A narrower last and toe box coupled with the option of half sizes and 'high volume' models make Giro shoes a great option. Higher end models feature upgraded insoles that provide arch support and adjustability!
And that is just a small sampling of our fit products. We can't forget the Speedplay sizing kit, the BIKEFIT wed shims nor the wedges from Steve Hogg...
April 29th, 2015: Full on!
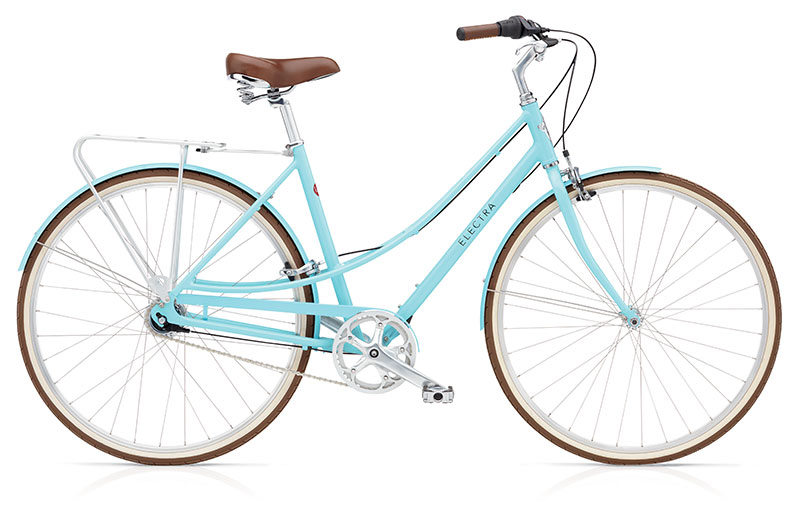
The season is on, in full, and now that we are into it I am going to come right out and say it ... Electra is the best thing to come to Speed River Bicycle this year.
Electra is not a performance brand ... it doesn't require spandex or anything really special. It simply requires a desire to ride and look good (seriously, they look amazing). Electra makes bikes for people who want a great quality bike that fits well, is light, easy to use and looks great. That is what makes Electra so great ... bikes for everyone.
The Townie & Ticino models are front runners for my favourite bikes going. For quite a while when we have sold hybrid bikes there has always been a trade off ... full leg extension or the ability to touch the ground. When we are cycling casually being able to touch is critical for comfort and handling but if we want to add some distance, getting that extension is equally important. Why do we need to choose?
With Townies and Ticinos we don't. Flat foot pedalling equates to leg extension and keeping your feet down. Efficiency and comfort.
http://www.electrabike.com/way-to-roll/flat-foot-technology

The Loft bikes from Electra are a close second. While they don't have flat foot technology they do use a remarkably lightweight frame coupled with an amazing finish. Zippy to ride and much less expensive than many other similar bikes the Loft is an amazing line.
March 7th, 2015: Touring and more
I thought we would keep more up to date on this here blog but the 'articles' planned are so grandiose and then take too much time and fade into the distance and ... never get done. So, from here on out, keeping it simple.
Of note: We know touring and we have some of the best touring gear out there.
First up: Arkel bags. The majority (all except their Orca and Dolphin line I believe) is made in Sherbrooke, Quebec. Canadian made and the best quality and warranty on the market. Old man mountain racks & Arkel racks are built to carry these bags in any condition.
Second: The new Trek touring line. The 520 & 520 disc are the bikes Trek was built on (well, not the disc version, but you get the gist). Trek has also added the 720 (road touring) and the 920 (adventure touring) to the stable giving you 4 touring bike options.
And, we don't just have the gear, we have the knowledge. Both Mark and Taylor have extensive touring knowledge and are more than happy to discuss whatever it is that needs discussing. We can fit you prior to your adventure to ensure mile after mile of comfort and tune your bike to perfection before you go.
Really ... we are the starting point for any touring you plan on doing!
Jan 13, 2015: New fit studio
We used to do fittings up on the floor for all to see. As the fitting process got more involved and as we learned more (read: as the customer was forced to sweat more) we realized that perhaps it wasn't the best place to do fits. As our tooling options expanded and the complexity of the operation increased we knew, it had to move. And ... we also needed a way better change room.
Thinking privacy was priority #1 we then moved the fit studio downstairs for two glorious years. And glorious they were ... in a slightly dark and small way. The exposed brick was beautiful and we were able to help alot of people but ... it was never quite right. During that time we made numerous investments in education and tooling. A precision fit size cycle, a pressure mapping system and a motion capture system. These tools were just begging for better lighting and airy open spaces.

After quite a bit of thought and some hard decisions (like reducing the size of the office) we decided to build a new fit studio upstairs. The fit studio has been fully operational for 4 days and in that time we have completed 5 fits and it is fantastic! Better lighting ='s better motion capture. A brighter, more open space makes for a more comfortable experience and a custom built studio means everything has its place and there is much less mess created in the process!

While it is operational we still have a few tweaks left to make. New carpet for the floor, cleaning up the wiring (by cleaning I mean hiding) and figuring out a fancy mounting system for the cameras (both side and frontal plane cameras.
There will be more pictures to come as the changes happen but, needless to say, it is fantastic! If you are thinking about getting a fit there is no better time than the present.
Dec 11, 2014: ION 700 Review
When I started in the shop, 10 or 12 years ago, the most popular lights for bikes were the cheapest lights. $5 lights with elastic bands that came in giant jugs ... you bought one, you strapped it on and you considered yourself safe. Higher lumen lights were really expensive, came with HUGE batteries and got really really hot so the market was pretty much exclusively aimed at the 24hr racer or folks who did alot of night time mountain biking.

Lead acid batteries were replaced by Li-ion or Ni-Mh batteries which drastically shrunk the battery size, reduced charge time and increased burn time. Halogen bulbs were replaced slowly by HID bulbs and then, finally, LED technology hit the market in a big way. 3 to 4 years ago we started getting lights that were 100 or 200 lumens and in the $50-100 range which was a huge improvement. Visibility (in terms of motorists seeing YOU) shot up as did the ability to see when cruising down unlit paths or around a poorly lit campus.
Since then, each and every year we have seen a decrease in price and an increase in power, burn time and ease of use. Trust me when I say this is a good thing because no one was made safe using those tiny little lights. A car would be within feet of you before noticing the light, not enough time for any evasive action or stopping.
So, lights have come a LONG way and that excites the commuter in me. The light that really caught my eye this year, and I have been using for 10 months so far, is Bontragers ION 700 headlight. A quick rundown on what it offers:
- 700 lumens
- 5 settings w/ power lasting 1.75 hours to 45 hours on strobe
- USB charge from empty to full in 5 hours
So on paper, with a retail price of $115, this is an amazing light. But how did it fare in the wild?
 I don't have the capacity to test the actual lumen output but, it has been measured by MTBR.com at 661 lumens. This is exceptionally bright, period. True, it isn't actually 700 lumens but to those 'in the know' (I'm not one of them) that is an acceptable discrepancy. What does this mean? This means, it is bright. Really bright. I commute 365 days of the year and recently it has been FOGGY, so foggy I would typically be a bit worried. Not with this light ... it pierces through the fog and I am seen by all. I've used it through some snow storms and rain storms as well. Again, plenty of brightness for me to see and for me to be seen.
Size wise this light is great. Small enough I can slip it off the mount and put it in my pocket when I leave it in public, solid enough I don't worry if I happen to sit on it (ie. it isn't all plastic).
The mount that comes with the light is Bontragers universal sync mount. This mount works really well with their smaller lights and while it installs very quickly (and detaches quickly) with the slightly heavier ION 700 there is a small amount of movement when riding along. Is this a problem? Probably not if you are strictly a commuter/city rider. It might cause an issue if you were to use this as your primary trail light for mountain biking. The light doesn't come with a helmet mount which is too bad. That said, I doubt the majority of people would use a helmet mount and it would simply serve to increase the product price.
Charging is quick and easy via a usb port that is nicely hidden under the light and sealed quite well with a small rubber gasket. Total charge time, if you were to let it drain out, is 5 hours which is on par with other high lumen lights. Plenty quick enough to charge while you are at work and more than enough to get it done over night.
Pros:
- Bright, great dollar per lumen value
- Solid design, sturdy
- Quick, convenient charging
- Great strobe settings that get attention
Cons:
- No helmet mount, handlebar mount could be more stable
- Can get hot (no heat sinks) if used at high power for long duration in hot climates
My personal opinion is as such: This is a fantastic commuter light and a great backup trail light (I prefer, and recommend, a helmet light as your main trail light) that gives you a great amount of power for the dollar. It is backed by Bontragers 2 year warranty AND their 30 day comfort (satisfaction) guarantee. Bontragers first foray into the saturated light market has been a resounding success.
November 27, 2014: We review the Boone 9 canti

The Boone 9 was, admittedly, the bike I had been waiting for since the inception of Treks Domane platform. The second we heard of the Domane our immediate reaction was ... "that would be perfect for a 'cross bike". So we waited ... and waited ... and the waiting paid off as both Cosmo and I received our Boone 9's early this year.
First Impressions: Out of the box my first impression was that it looked amazing. I am a big fan of subdued paint schemes so the matte black w/ subtle red highlights was right up my alley. Internal cable routing, while great for cable longevity, is a pain to set up but fortunately our friends at Trek did a great job pre-routing everything so I was not too fussed getting it dialed in.
While I would have far preferred the Avid Ultimate brakes to be spec'd on the bike I decided to give the TRP brakes a whirl. This was really the only slight disappointment during the build.
First Rides, first impressions: My first rides were going to be on what I took my past ... 6 or 7 'cross bikes. Rail trail, single track, dirt road and pavement. This was also my first time on the newest Ultegra gruppo, with cross specific rings, so I was pretty excited.
On the road the first thing I noticed was no toe overlap. This was a mildly annoying feature in my past Trek CX bikes, especially when in tight handling situations where more wheel turning was necessary, so it was nice to see this remedied. I don't race currently so I find myself heading to easier singletrack more often making toe overlap a key consideration. If I am commuting around town on the bike and track stand at a light, again, toe overlap comes into play.
The second thing I noticed was that it handled all of the small bumps JUST like my Domane did. When I took it to rougher single track or zipped across the grass at a park it really smoothed everything out and made for a much more pleasant ride. Early spring conditions on the local rail trails were pretty rutted and again, the Boone soaked it up nicely. Iso-speed decoupler ... you do your job!
The third, and biggest thing, I noticed was the handling of the bike. Past Trek CX bikes had a tendency to 'wheel flop' and they weren't always the best handling in tight situations. They were fast and responsive on the flats but just didn't handle like ... race bikes. This bike was, to overuse a term, nimble and quick. Where I pointed it, it went without argument.
Lastly, while I don't have any lab data but I would be of the opinion that the meagre power I put into the pedals arrived nicely at the wheel due to what seems to be a quite stiff chainstay set up.
Parts & contact points: I'm of the opinion the stock saddle is pretty irrelevant on higher end bikes as you will most likely just swap it out. I rode the evoke saddle for a bit and then moved to my preferred Paradigm R for a better width. The handlebar stem combo were good for me with the bars have a bit more reach than I like on my road bike. That said, the 54.5cm top tube coupled with the 90mm stem meant the extra reach in the bar was actually pretty nice.
The RL wheels have held up well through the summer and with my 170lb soaking wet frame I found them plenty stiff and responsive. While I admittedly haven't put it through the race pressure cooker I did: pull a 55lb trailer, ride single track, ride terrible dirt roads and generally treat it like a hardtail mountain bike. No broken spokes, minimal truing required and no noticeable flex when powering the pedals out of the saddle.
The CX3 tyres were excellent for trail with enough side knob to let you lean the bike a bit through the turns. The fairly aggressive tread made quick work of steeper dirt climbs and they seemed to hook up quite well on grass. They aren't the fastest rolling tire but as an all rounder, you can't go wrong here. As I have a tendency to do mixed surface rides (road, rail trail, single track then road again) I prefer a file tread as my go to. That said, I put a couple thousand km on these and they more than did their job.
The TRP brakes have become accepted on the bike and I no longer feel the urge to change them. The setup is a bit of a pain, and they don't have the adjustability of their Avid equivalents (wide and narrow stance), but, once it is dialed in they work as well as any high end canti I've used. Pad choice is always key and I've typically gone with the R55C3 pads and now I've moved to the R55C4 which always improves braking from the stock set up.
Final Verdict: After 7 (maybe more) months of riding I have come to the decision this is the best bike I have owned. Period.
But Tim, you must be exaggerating to say that. Well, I'm not. A cross bike was typically my preferred bike until the Domane. Then the Domane, because I could cruise dirt roads, became the bike of choice. Now, I've got all of it in one bike.
Do I have any beefs? To be honest there are two. The first is that , yes, I have accepted the brakes but I feel the Avids would be a better spec. The second is that the disc versions still have the hidden fender mounts ... but the canti bikes don't? As a mostly non-racer (right now) the fender mounts would have been perfect due to the obvious fact a full set of fenders is far superior to a partial clip on set.
So, to finish this off ... I love it. I recommend it. I think everyone should have one. Simple.
November 14th, 2015: Size before you buy ... fit first
When purchasing a bicycle, especially a road bike and most definitely a tri bike, you need to think about size and fit, first and foremost.
Road cycling is highly repetitious and it lacks the up/down/shimmy of mountain biking so getting the right position, and the right size frame, is incredibly important. Tri bikes, even more so, due to the aggressive position you are put in coupled with the demands once you get off the bike.
You want to take a look at where your flexibility, mobility and stability are now and think about what your goals are for the short term and the long term.
For example: I am very interested in triathlon and want to get a tri bike for next years sprint distance tri. Long term I am interested in Olympic and then maybe a half Ironman. Those are my goals, next we assess my flexibility in a broad sense. A simple forward bend test shows that I have less than optimal hip and lumbar flexion (something like image 2).
So we decide to check my active hamstring length and, not so surprisingly, I don't have much going on in that category either.
It appears I am as flexible as a breadstick (and not a soft one at that) which leads to the discussion, is a tri bike the right bike for me right now? And the reality is, probably not. We go through a few other tests and then, because we can, we use our size cycle to mock up a tri bike and assess how I would look on the bike.
In the end I settle upon an endurance road bike that incorporates a slightly shorter top tube (less reach) and a slightly higher headtube (more stack) and vow to work on my weaknesses so that I can achieve the necessary physical parameters to ride a very aggressive position for an extended period of time. The reality is that I didn't meet the requirements for the tri bike and if I had gone forward with it I could have opened myself to injury (at the worst) and if I can't hold the position I put myself at risk of slower run times and slower bike times.
So, that is a brief outline of the thought process that would go into selecting a frame. Think of your goals and activities, get an honest assessment as to where you stand physically and how it relates to your desired bike and then go through a few bike options and sizes on a size cycle so you know what to expect, position wise.
Take a fit first mentality when you are purchasing a new bike and you cannot go wrong.
December 19th, 2015: Tacx Vortex, long term review

This is my second season running the Tacx Vortex Smart as my indoor training device and I figured it was time to write up a review. The Vortex Smart is Tacx least expensive smart trainer coming in at $649. It sends out both bluetooth and ANT+ signals and you can download free app based training softward for Android and IOS devices. This year tacx updated their units and they can now communicate with awesome programs such as Zwift and Trainer road which really opens the capabilities of this trainer up.
So what do you get for $649? You get the trainer unit and the front wheel block plus the downloadable apps
First off ... the stats:
- Realistic slope 7% 1
- Max brake power (10 sec.) 950 Watt
- Sprint power (1 min.) 750 Watt
So what does this mean? It means when you are using the trainer in erg mode (or via Zwift, Trainer road etc...) the most this will simulate is a 7% grade. The max brake power means once you cross 950 watts (over 10 seconds) it does not have the capacity to resist you further, same with the max 1 minute power. In what way does this matter to the average consumer? Simply put ... it really doesn't. MOST people will find the Vortex will fully hit their needs in every situation.